
Celebrate Día de los Muertos with 7 Creative Art Projects for Kids
- Oct 23, 2025
- 4 min read
Updated: Feb 18
Día de los Muertos, or "Day of the Dead", is a vibrant Mexican tradition that honors and celebrates loved ones who have passed away. Celebrated on November 1 and 2, this colorful holiday brings families together to share stories and remember loved ones.
In this blog post, we’ll explore some kid-friendly art projects that honor Día de los Muertos. Each project is fun and engaging, helping kids express their creativity while learning the meaning behind this special day. We'll also share tips for preserving this artwork with Artkive so these memories last a lifetime.
1. Build a Shoebox Ofrenda (Mini Día de los Muertos Altar)
Families use these altars to honor deceased loved ones with photos, favorite foods, and special mementos. A mini ofrenda helps kids understand the role of altars in Día de los Muertos.

Materials Needed:
a Shoebox, Photos of loved ones, Colored tissue paper, String or Yarn, Markers, Glue,
Tea Lights (optional)
How-To at a Glance:
Decorate the shoebox with colored paper and markers.
Add photos and small items that represent your loved ones.
Place the ofrenda in a special spot at home.
For detailed instructions, check out this guide.
2. Papel Picado Banner
Papel picado, or perforated paper, is a traditional decoration used during Día de los Muertos. These colorful banners add a festive touch to any celebration and are a great way for kids to practice their cutting skills.

Materials Needed:
Construction or Tissue paper, Scissors, String, Tape
How-To at a Glance:
Fold the tissue paper and cut out designs.
Unfold the paper to reveal the patterns.
Attach the papel picado to a string and hang it up.
For a step-by-step tutorial, visit the Live Colorful Blog.
3. Tissue-Paper Cempasúchil
Cempasúchil (marigolds) are a hallmark of the holiday, symbolizing life’s beauty and death’s fragility. Making these flowers is a fun and colorful art project for kids to enjoy.

Materials Needed:
Yellow and orange tissue paper, Scissors, Pipe cleaners, Ruler
Decorative edge scissors (optional)
How-To at a Glance:
Measure and cut tissue paper into 4x9" sheets.
Layer and fold them, then secure the stack with a pipe cleaner.
Lift the sides toward the center to form the flower.
For more detailed instructions, check out this resource.
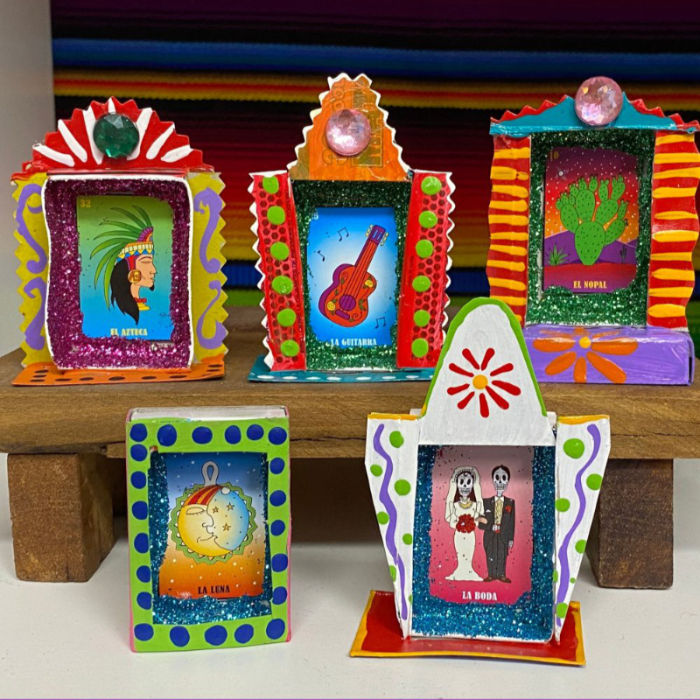
4. DIY Matchbox Nicho Shrine
A Nicho, or memory window, is a small shrine that holds photos and mementos of loved ones. Creating a mini nicho allows kids to personalize their remembrance space.
Materials Needed:
Empty Matchboxes, White craft glue, Scissors, Paint, Glitter glue or loose glitter, Photos/ Images, Gems/sequins
How-To at a Glance:
Glue your photo inside the matchbox base.
Add glitter to the inner frame.
Cut the matchbox sleeve into a base and decorative wings.
Paint and add decorations.
For a full guide and video tutorial, check out the Crafty Chica blog.
5. Calavera Paper-Plate Mask (Skull Art)
Calaveras, or skulls, are iconic symbols of Día de los Muertos. Making a paper-plate mask is a fun way for kids to get creative and learn about this important symbol.

Materials Needed:
Paper plates, Paint or markers, Glue, Decorative items (glitter, sequins), sturdy paper straw, or craft sticks.
Lucky Charms (optional)
How-To at a Glance:
Trace your outline and cut out eye holes
Paint the paper plate to create a skull design.
Add decorations to personalize the mask.
Attach to a sturdy straw or craft stick to wear.
For a simple version, check out this guide.
For a fun 3D version that stands out - check out Hispana Global
6. Luminary Bags
Luminaries light the way for spirits of loved ones during Día de los Muertos. This simple project adds a soft glow to your celebration.

Materials Needed:
White Paper bags, Battery-operated tea lights, Markers or stickers
How-To at a Glance:
Decorate the paper bags with designs.
Place a tea light inside each bag.
Arrange the luminaries around your ofrenda.
For a step-by-step tutorial, visit this link.
7. Glowing Lantern Jars
Painted jar lanterns are a creative way to add light to your Día de los Muertos celebration. Kids can personalize their jars while learning about the importance of light in guiding spirits.

Materials Needed:
Glass jars, Acrylic paint, Paintbrushes, Battery-operated tea lights
How-To at a Glance:
Paint and design the jar's exterior.
Allow the paint to dry.
Place a tea light inside each jar.
For more detailed instructions, check out the Growing Up Bilingual blog.
She also has a glass-free version safe for little ones.
Preserve The Art Projects for Kids with Artkive

The best part of Día de los Muertos is the celebration of memories through creativity. At Artkive, we believe the same is true with kids' art. That's why we offer parents a fantastic solution for keeping these memories alive.
Our team can transform all your kids' arts and crafts into a beautiful memory book or framed mosaic. Keepsakes like these uplift children's confidence, encourage cultural appreciation, and support storytelling within your family.
Para concluir...
Whether you celebrate this holiday every year or are just learning about it, we hope your family enjoys these inclusive art projects. May they inspire you to honor loved ones and deepen your understanding of this beautiful tradition.
So gather your supplies, unleash your creativity, and celebrate the amazing lives of those who came before you.
¡Feliz Día de los Muertos!


