
Kids Art Frames: From Scribble Art to Gallery-Worthy Decor
- Sep 26, 2024
- 6 min read
Updated: Jun 26

Your child marches in, paper held high, with that look on their face. Pure pride. Whatever's on that page — a swirl of colors, a crooked house, a purple horse — it means everything to them. And honestly? It means everything to you, too.
Turning kids artwork into a framed display is one of the simplest ways to honor what your child creates and add something personal to your home. With the right kids art frames, those fridge favorites become a display worth showing off. Here's how to do it well.
Celebrating the Scribbles
To us, they might look like a tangle of lines. To your child, that scribble is a whole story — a bold expression of something they saw, felt, or imagined. Embracing these early drawings is key to building imagination and confidence. A scribble from age three deserves just as much love as the careful watercolor they'll paint at ten.
Don't wait for the "good" art to start displaying. The early stuff is the stuff worth celebrating most.
Why Displaying Kids Artwork Matters

When you put your child's artwork on the wall, you're telling them their effort counts. It builds self-esteem. It encourages them to keep creating. And it gives your home something no store-bought print can match: a piece of your child's story.
Thoughtfully chosen artwork frames make a real difference. A marker drawing in a clean white frame looks entirely different from the same piece stuck to the fridge with a magnet. That shift in presentation matters — to your child's sense of pride, and to your space.
Choosing the Right Pieces
Every creation is special, but framing everything isn't practical. Here's how to decide what to highlight:
Ask your child. Let them pick their favorites. It's their art — their vote should count. You'll also learn which pieces they're most proud of.
Look for milestones. The first drawing of a recognizable person. A painting that marks a new technique. Pieces that show growth are worth holding onto.
Think seasonally. Rotate art by season or holiday to keep the display fresh and give new work a chance to shine.
Kids Art Frame Options: What's Out There
Once you've selected the artwork, it's time to pick the right kids art frames. There are more options than most parents realize.
Colorful frames. Match the vibrancy of the art with bold, bright frames. A colorful kids art display frame adds personality without competing with the work inside it.
Gallery wall. Arrange multiple framed pieces together and mix sizes and styles for an eclectic look that evolves alongside your child's work.
Shadow boxes. Great for 3D projects, collages, or textured pieces that need a little extra depth to shine.
Clipboards and Corkboards. A flexible, casual option that makes swapping in new masterpieces quick and easy — no tools required.
Front-opening frames. Designed specifically for kids artwork, these have a front panel that swings open so you can rotate pieces without removing the frame from the wall. Convenient — but you're always choosing which piece gets to be seen and which gets put away.
If showing one piece at a time isn't enough for your little artist, there's a better option.
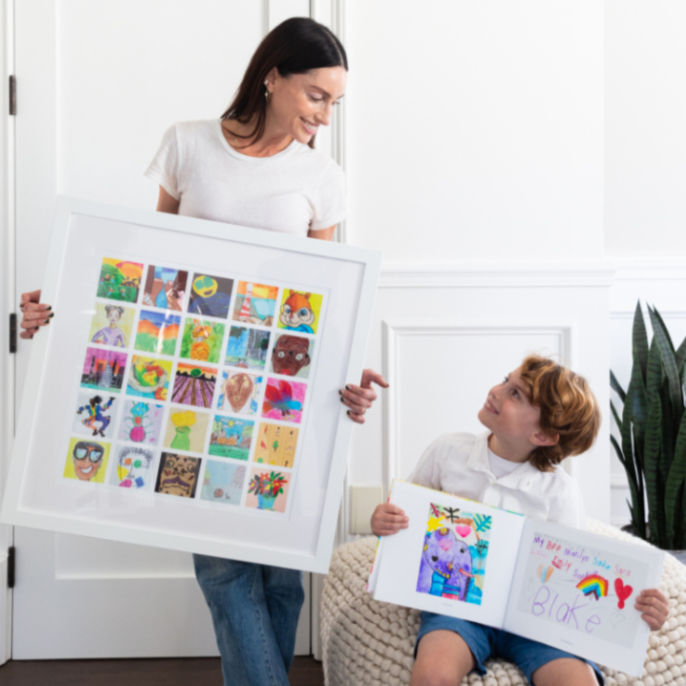
The Artkive Mosaic: Every Favorite, One Frame

The Artkive Mosaic takes a completely different approach to displaying kids art. Instead of rotating one piece in and out, you display your child's favorites all at once — in a single, beautifully matted wall art piece built to last.
Here's how it works. You fill an Artkive Box with your child's artwork and send it in. Our team professionally photographs and edits each piece. You pick your favorites and receive a digital proof to review before anything goes to print. We then collage them into one solid wood gallery frame with professional matting.
The Artkive Mosaic comes in two sizes:
Large (26"×26") — showcases 25 pieces, $249 (or $189 bundled with an Artkive Book)
Small (14"×14") — showcases 9 pieces, $149 (or $99 bundled with a Book)
You also get access to your digital images on the Artkive website and iOS app, so the artwork is preserved well beyond the frame.
It's also one of the most meaningful gifts you can give grandparents. Instead of choosing just one piece, they get 9 or 25 of their grandchild's favorites — on the wall, every day, in a frame that looks like it belongs there.
DIY Framing: Get Your Child Involved
Involving your child in the framing process turns it into a creative project of its own:
Decorate frames together. Start with plain frames and let your child add stickers, paint, or washi tape. No two will look the same.
Make custom mats. Cut mats from colored paper and invite your child to draw or write around the edges before placing the frame on the artwork.
Repurpose what you have. Cardboard, thrifted frames, or scrap wood can become charming custom kids art frames with a coat of paint and a little imagination.
Create a Dedicated Art Space
Give your child's artwork a permanent home. A section of hallway wall, a corner of the living room, or a bulletin board in their bedroom all work well. A dedicated space gives kids a real sense of pride and ownership — they know exactly where to look to see their work celebrated.
A few cohesive artwork frames can pull the space together while letting each piece stand on its own. For more display ideas, check out 7 Trendy Ways To Display Kids' Art.
Keep Rotating, Keep Celebrating
Make a habit of rotating pieces regularly. Swapping in new work keeps the display dynamic and celebrates what your child is creating right now. A seasonal refresh works well for most families — new work goes up, old favorites come down, and the wall stays alive.
Preserve What You Rotate Out
When a piece comes down, don't let it disappear into a drawer:
Photograph it first. A quick phone photo before you store or recycle a piece builds a digital archive you'll be glad you started.
Artkive Art Books for Kids. Store originals in a portfolio or binder so you can revisit them anytime. When the collection grows, an Artkive Book turns everything into a keepsake worth keeping on the shelf.
A Gallery Worth Coming Back To
Turning kids artwork into something frame-worthy is one of the joys of parenting a young artist. It tells your child their work matters. It turns your home into something personal. And it creates a record of their creativity, you'll come back to for years.
Start with the right kids art frames, dedicate a wall, and let the display grow alongside them. When one frame isn't enough to hold all their favorites, the Artkive Mosaic is ready when you are.
Frequently Asked Questions
What are the size dimensions of the Artkive Mosaic frame?
The large Artkive Mosaic is 26"×26" with a 24"×24" gallery print. Each of the 25 images within the print is 3"×3". The small Mosaic is 14"×14" and features 9 images. Both come in a solid wood, white gallery frame with professional matting. Black frames are available upon request.
How much does the Artkive Mosaic cost?
The large Mosaic is $249 on its own, with US shipping included. Add an Artkive Book to your order, and the Mosaic drops to $189 — meaning a Mosaic and a 25-piece Book together comes to just $264, only $15 more than the Mosaic alone. The small Mosaic is $149 standalone, or $99 bundled with a Book. If you send more than 25 pieces, additional pieces are charged at $1.35 each.
Can I put my child's name on the Mosaic?
Yes. Every artist deserves to be recognized. You can request your child's name at the bottom right corner of their Mosaic — just note it on your order form or mention it when you submit your art through the Artkive app.
How do I protect kids artwork from fading in a frame?
Standard frames offer limited protection from UV light, which causes colors to fade over time. UV-protective glass helps, as does keeping frames away from direct sunlight. For long-term preservation, Artkive's process captures your child's artwork through high-resolution photography before anything is framed — so even if an original piece fades, your digital files and printed Mosaic stay true to the colors your child put on the page.
How long does it take to receive my Artkive Mosaic?

